Flannel Coasters- quick & easy gift idea for father’s day!

At least at the preschooler skill level, this is one of those gifts that will probably only be appreciated by people who REALLY love your kid and/or don’t have a strong aesthetic attachment to their coasters, as it is a gift that is vaguely functional, but mostly sentimental.

Br (3 1/2) made his first one for my mom for Mother’s Day (who lovingly exclaimed at the “artful” placement of the stitches, with great sincerity), and we decided this might be good to make for Daddy for father’s day.  I thought it might slightly compensate for the fact Br regularly asks unanswerable questions like “Why does Daddy drink soda all the time when it’s not good for you?” ( I SWEAR I didn’t put him up to it)

Materials:

-flannel (we used 2 different colors of the small rectangular pieces you can by for ~$0.25 for plain solid colors to ~$1.00 for the “fancy” embossed/glittery/etc. ones)

-something “coaster sized” to trace (keep in mind straight lines are easier to cut)

-chalk (we used sidewalk chalk)

-scissors

-needle & thread (Br choose to do 2 different contrasting colors.  Hey, it’s his present to Daddy…)

Tracing the coaster on to the flannel

I helped Br line our object up with the corner of the flannel (so he’d only have to cut 2 sides) and steadied it while he traced around it with the sidewalk chalk.  Br is old hat at this now, but make sure to explain to them to keep the chalk right against the object so they get a nice straight line, and check that it is showing up on the flannel, in case they need to trace over it again.

Have them cut along their chalk lines.


Cutting out the coaster
Cutting out the coaster- Voice of experience: if you don't want a "rounded" corner, it can be helpful to explain to them it is easier to get the nice square corner if they cut one side, then stop and cut the other side until they meet

Repeat with the second piece of flannel.  Match the 2 pieces together.  Let your child choose their thread (Br chose “aqua” thread for the first needles worth, and “black” for the second), and thread the needle.

Voice of Experience: I “double-threaded” it so the thread won’t pull out of the needle as they are sewing- pulled the thread through so it is doubled over (twice the length you want it, with the needle in the middle, and then the two ends tied in a single knot) and made it about a foot and a half long (long enough to give room for free sewing, but not unmanageable for short arms).  I did need to do multiple needles worth for Br to get the whole coaster “sewn”.

knot from thread hidden in middle

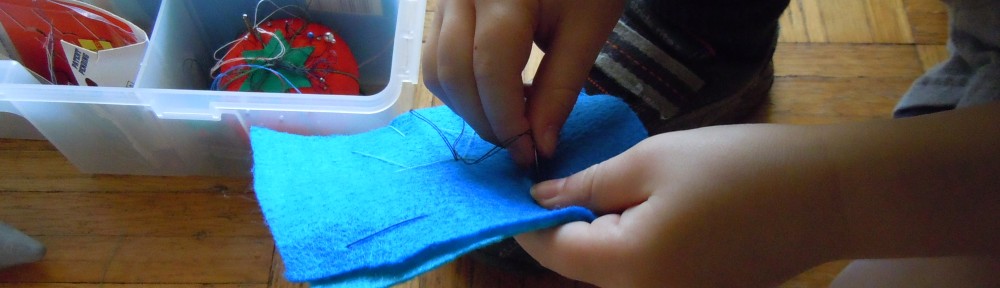
I started the needle in the coaster for him (put the knot on the inside),and then let Br take over.  The first time we did this activity was the first time Br had sewn, so here is a summary of the directions I gave him:

1)showed him the needle and explained the pointy end is what he will push though the cloth, but to watch out that he doesn’t poke himself with the pointy end

Br starting sewing
Br starting sewing

2)Once he has poked the needle partially through, grab the needle on the other side and pull it the rest of the way through

3) pull the thread tight, but not so tight the fabric gets wrinkly (showed what it looked like if the thread isn’t tight enough, as well as how to flatten it back out when it gets pulled too tight)

Br sewing
Br sewing- second needles worth, where Br decided he needed to switch to black thread

4)be careful to go back in with the next stitch from the same side you came out (this needed lots of reminding, with a few we didn’t catch early enough, which then goes back to making sure you don’t pull the thread so tight it gets wrinkly…)

I kept an eye out for when the thread was getting short, then offered to tie a knot and start a new thread for him.  He was pretty well done with the activity by the time we were almost done with the second needles worth (was starting to suggest “Mommy, you can finish it…”)  I tried to suggest he put some stitches in corners he hadn’t sewn yet as he was getting to the end.

Br showing his finished flannel coaster for Daddy

Happy Father’s Day!


You might want to read this too:

  • This post was singularly original...wander at will!

The importance of a balanced diet… (oh, and potty training)

We all know it is important for children to have a healthy, balanced diet for them to reach their full potential, physically & mentally.  Vitamins, minerals, proteins, blah, blah, blah…

I have a skinny kid.  You never would have guessed it when he was a baby.  Br was a “triangle” shaped baby (the pin-head didn’t help…) Once he got mobile, eating fell way down on his priority list.  Personally, we’ve often had to catch ourselves when Br is acting up and consider “when was the last time this little monster kid ate?”  When Br started preschool, we gave them a heads up to watch for that, and remind him to have snack…

With this in mind, Br was having a tough time about when dinner was ready last night.  We’d had a busy day (see the “Plumbing” activity, and some other stuff I haven’t blogged yet), plus I was trying a new tactic on the potty training front.

Potty Training aside:

Br has been great for #1 for probably close to a year, but still struggles for #2.  I’d read the suggestion if the child has an “accident”, to have them clean themselves up & then have them “practice” what they would do if they feel the urge to “go potty” 10 times.  The theory is you provide muscle memory so they are quickly able to respond correctly next time, and, probably most importantly, you make having an “accident” laborious enough they’d rather just go in the potty in the first place.  He found the first 3 times amusing (especially as we tried from a different place in the house or outside each time). After that, he kept suggesting we should only need to do “2 more?” (I guess we do a lot of “2 mores”?).  Turns out it was a prime opportunity to work on counting backwards & subtraction: “Not 2 more. You’ve practiced 3 times, so we have 7 practices left!”, etc.  And we got to do it twice yesterday…

BTW, I think the saddest voice I have ever heard my husband use was when potty training came up when we were out somewhere. He voiced the most pathetic ” I HATE potty training. *sigh*”

So, dinner time:  Br wouldn’t eat much.  We offered “dip” (ketchup).  He tried cajoling, reasoning, veiled threats… nothing was working.  Finally, Br randomly perked up and said he “needed chopsticks”.  I’d assumed eating was a lost cause at this point, so didn’t bother to protest when he ran to the silverware drawer.  Now, we have a number of chopsticks laying around as I am a firm believer if I am eating Chinese food, I must be “authentic” and eat it with chopsticks. ( My husband only eats “Lemon Chicken”, which isn’t authentic at all, and feels no such compulsion.)  Br has tried chopsticks on a few occasions after watching me, with little success.

Br returned to his seat, and my husband tried to get him to spear his chicken with the end of one chopstick. That didn’t work. But then Br tried to use the chopsticks…as chopsticks! And succeeded (mostly…we reloaded the plate from his seat a few times)!

He ate the rest of the chicken on his plate, plus I managed to sneak in a few more green beans by exclaiming over how “I bet those would be tricky! Let’s try that!”, followed by the “wow, can you do it again? Oh, I don’t think Daddy saw.. could you show Daddy how you did that?”

Parental unearned success I am claiming anyways: my kid ate a good, well-balanced (literally!) dinner, and got some fine motor practice in as a bonus.

Once again the power of novelty wins the game….

You might want to read this too:

  • This post was singularly original...wander at will!

Plumbing: who new it was fun & educational?

I just got a great new resource: Montessori At Home! by John Bowman. I’d contacted him to see about ordering both the CD & the updated hardcopy book, and he offered to send it to me for feedback & to review on the website.  I’ve only read about a third of the book, and I already have post-its poking out all over it as I marked activities that I HAVE to try.  Also an awesome breakdown of Montessori philosophy and the best practical points I have seen on how to set up the activities (PHENOMENAL explanation-with pictures even!!- of the types of activities that should be set up to progressively teach your child the correct hand position for writing).

Turns out there are some things I haven’t done ideally. For example, Mr. Bowman says it isn’t a good idea to set out materials until you have the activity completely set up.  Makes sense.  If I am trying to instill in my child respect for the materials and always making sure he takes care to put his stuff away properly, I should be modeling by respecting the materials enough not to put it out until it is ready for him to do his part.  Oops… (Of course, as I write this, I still  haven’t taken the half-completed items off the shelf yet. Note to self: do before bed!)

You: “Ummm… where’s the part about plumbing?’

So, one of the activities suggested in Montessori At Home is pipe building. When I spotted that, I thought “OMG [I didn’t actually think the letters, but I am sometimes lazy in typing], Br is going to love this activity!!!!!!!” [I did think that many exclamation points] Br has loved all things tool related from near-infancy. I finally got him to sign “please” by having a tape measure on a shelf he couldn’t reach.  And while this pipe building didn’t actually use tools, it uses things that are closely related to tools.  (Br did REALLY want to use tools, and had to be reminded that his hands were his “tools” for this activity multiple times, and if he DID use a real pipe wrench, he wouldn’t be able to get it back apart when it was time to put the job away…)

We ran out as close to first thing this morning as I manage with two kids & no emergency, and got pipe parts at Home Depot.  The book suggested 1″ pipe parts, but when I had Br try to fit them, they seemed heavy for Br to handle, so I ended up going with 3/4″ galvanized steel parts.  The boxes were a bit of a mess (things weren’t matching up with their label), but a very helpful HD employee helped us to find the pieces.

Materials:

-mixture of 3/4″ ‘male’ & ‘female” galvanized pipe fittings. Specifically, we used: x2 3/4″ “Tees”, x2 3/4″ “90 degree elbows”, x2 3/4″ “45 degree elbows”, x1 3/4″ “sideout elbow”, x5 3/4″x4″ straight piece, x2 3/4″x5″ straight piece, x4 3/4″x6″ straight piece

-marble/rock/bead (smaller than 3/4″ diameter)

-substantial container with good handles for storing/carrying (still working on this part…) {They are heavy!- Bl dropped one on his toe. There was crying…}

Voice of experience: We did have one straight piece where the threads were messed up & it wouldn’t screw together. Luckily we caught it early, so Br didn’t get too frustrated. It would have been a good idea to just quickly try all the pieces at the store.  I did rub the threads with soap to make it easier for them to screw together/apart.  (Yes, you literally take a bar of soap and rub the threads across it, so little soap flakes are in there. It helps lubricate it. I don’t usually use bar soap, so all I cold find was a travel size rose-scented soap in our house…) For the detail oriented, you may note a “cross” (“4 hole” piece) in the picture. I will be taking it back. Made the pipes just run back in to each/not work well. And it was expensive (over $6!).

Bl getting in on pipe fitting, too

Br built his free form “pipe sculpture”, which took awhile. Especially with attaching things facing different directions, there were a few challenges with remembering which way to turn it to tighten, as well as the dilemma movements to tighten one piece might loosen another.  Some great problem solving opportunities.  There were some partial dis-assemblies in the process.  Once he had it mostly together, I pointed out to him we wanted to cap all but 2 openings, 1 opening for stuff to go in & 1 for stuff to go out.

pipe fitting 1pipe fitting 2pipe fitting 3Bl noticed that he could also make fun sounds/sound “travel” by yelling into one end of the pipe.  That added  a bonus element of fun…

Once the pipe was built, it was time to test it out.  Mr. Bowman suggested a marble or actually running water through it.  I opted for marble, but couldn’t locate one. I did find as options 1 wooden bead, 3 small white stones, and a small black glass florist thing.  They used them all.  This is where it got super cool.  I’d realized we would be working on fine motor skills, left & right (“right-ey tight-ey, left-ey loose-ey”), & some spatial reasoning putting the pipes together.  I hadn’t thought about the sensorial & science aspects.  To get the pieces to move through the pipes, we discussed gravity & what part of the pipes to lift to make them roll where we wanted them too, & “hypothesized” where we thought they were.  Sensorially, besides Bl yelling into the pipes, there was focusing on the sounds of the objects as they moved through the pipes & using that to try to pinpoint where they were, as well as the differences between the sounds the wood bead made versus the rocks & glass piece.

Awesome, awesome activity.  Thank you Montessori At Home!


You might want to read this too:

  • This post was singularly original...wander at will!