Freezer Paper Stenciling- Father’s Day gift for the uber-procrastinator

First, I apologize for not getting this post up in time for anyone else (except the uber-procrastinators :)  ) to try it for Father’s Day.  Sometimes I forget that everything takes x5 longer with kids…

I’d run across the idea of freezer paper stenciling, and had added it to my “someday” list on my website as a cool activity to try.  When I was trying to come up with something to do for Father’s day presents, ran across an idea for a T-shirt done with the kids handprints, and I was inspired to combine the two.  Hmm: trite, dated, required to wear, probably made with offensive color combinations? Perfect Father’s Day present!

Materials:

– T-shirts (if new, recommend prewashing- and confirm size- see my post script…)

-Fabric Paint (I’d read you can find “Textile Medium” to add to acrylic paint to turn it into fabric paint.  I couldn’t find it. I found cheap fabric paint at WalMart-primary colors, white, & Neon Green (Br’s FAVORITE!) and mixed to get additional colors- hey, extension lesson on color mixing!)

-freezer paper

-exacto knife

-cutting mat ( or extra cardboard)

-cardboard

-masking tape

-iron

I’d read somewhere you could print on the freezer paper, so I cut some of the freezer paper down to 8 1/2″by 11″ to fit in my printer.* I made a graphic of what I wanted to print (in Mountain Cow’s Printing Press Extreme, which I LOVE even though my version is about 6 years out of date.  As this project was just words, you could probably just use a word processing program).  Make sure you put your paper in so you print on the “matte” side of the freezer paper.

*Voice of experience: the paper curled, so my printer couldn’t “find” it in the regular tray.  I was able to get it to feed in the separate tray our printer has in the back for photo paper, etc.

Once I had my graphic printer, it was time to whip out the exacto knife & cutting mat. I taped the stencil down to the mat with masking tape to hold it still.

Cutting out the printed graphic on the freezer paper
Cutting out the printed graphic on the freezer paper- make sure to keep all the "inner bits'- the middle of the "o", etc.!

Voice of Experience: Cut out the interior pieces on the letters first.  Its a lot easier than trying to hold the $@!#$ already cut out letter still…

A lot later than I expected (and with more hand cramping), I had the graphic all cut out.  You may notice I wimped out and didn’t cut out the words “Father’s Day”.  I’m okay with that.

Graphic all cut
Graphic all cut

Place cardboard inside the Tshirt (to keep the paint from seeping through to the back, and to give you something hard to stencil on. Make sure there are no bumps or creases under the stencil). Transfer the freezer paper stencil over to the T-shirt, and carefully place any “interior bits”.  A toothpick might be helpful to assist in positioning the “interior bits” (sweaty fingers- NOT helpful).  Make sure the “shiny” side is down.  Otherwise it will stick to the iron, rather than the T-shirt, and one might have to avoid cursing in front of the children while trying to get the bits off of a hot iron…

I used a “Clover Mini Iron” to iron the stencil on.  A regular iron should work too, but I had it… It was an impulse craft purchase a while back (it was on sale, and I was sure someday I would do something where I mini iron might be handy… Hey, look, I just justified it! It was a few years early Father’s Day-ish present!), but it was actually helpful to make sure I got the “interior bits” ironed in the right spot.

Ironing the stencil with the "mini iron"

Make sure you iron well around all edges.  Then get your paint and brush and dab away!  I did multiple thing coats to start, then a thicker coat to finish.  I was going to have Br do this, but he was off doing an errand with Daddy, and I needed drying time.

Painting freezer paper stencil


Painting freezer paper stencil

Once it was painted, I let it sit for a few minutes (while I painted the other ones) and then peeled the stencil off.  I initially tried to peel off the “interior bits” at this point too, but it smudged the paint, so I did it carefully after it was completely dry (it was helpful to bend the Tshirt by the edge of the “bit” to help get my fingernail under, and to carefully peel so I didn’t pull the paint up from the letter).

peeling up the stencil

I had done Br’s handprints before I did the stencil ( and all the other grandkids for “Pop-Pops”), but did Bl’s after the stencil.  Not on purpose.  That was just how it worked with naptimes, etc.  I tried to get the hand prints so they made a “heart” shape, then emphasized it with a heart shape painted inside (some freehand, some stenciled from a heart papercutter).

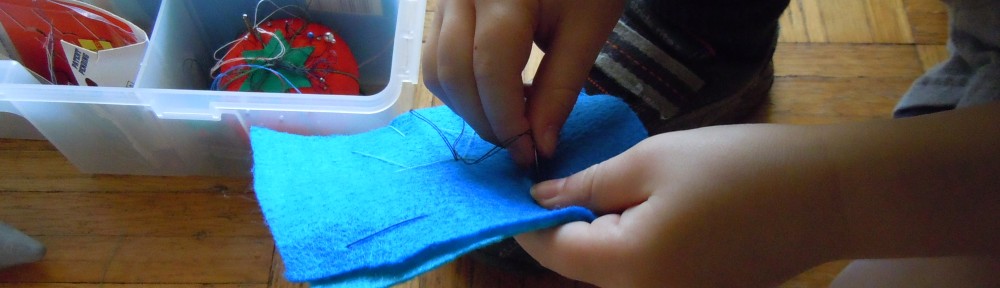
To do the handprints, I painted their hands using a foam brush with the fabric paint.  With Br I did both hands at the same time, with Bl I did them one at a time.  Hubby suggested dipping their hands on a plate with paint (orange had perpendicular to name), but the coverage wasn’t as complete, and Bl seemed to tolerate the hand painting a lot better (orange hand parallel to name).  I don’t have a picture of that process as I don’t have 8 hands (3 hands would not have been enough).

Finished "Papa Will" shirt

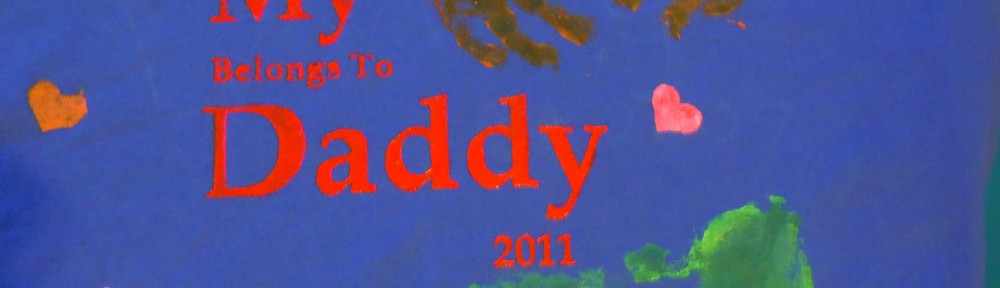
And for my hubby, my most inspired/obnoxious of all :) :

My (heart belongs to) Daddy

Bad News Post Script:  Turns out T-shirts under $5 don’t always have the most accurate sizing (who knew?).  Pop-Pops shirt was too small, so we will be gathering all 6 grandchildren again sometime this week to remake it…  teach me to go cheap….  After this news, I had “Daddy” try on his.  Good thing Daddy’d been working out lately… wouldn’t have been pretty with “winter weight”. We’ll see about Papa Will’s…

You might want to read this too:

  • This post was singularly original...wander at will!

Flannel Coasters- quick & easy gift idea for father’s day!

At least at the preschooler skill level, this is one of those gifts that will probably only be appreciated by people who REALLY love your kid and/or don’t have a strong aesthetic attachment to their coasters, as it is a gift that is vaguely functional, but mostly sentimental.

Br (3 1/2) made his first one for my mom for Mother’s Day (who lovingly exclaimed at the “artful” placement of the stitches, with great sincerity), and we decided this might be good to make for Daddy for father’s day.  I thought it might slightly compensate for the fact Br regularly asks unanswerable questions like “Why does Daddy drink soda all the time when it’s not good for you?” ( I SWEAR I didn’t put him up to it)

Materials:

-flannel (we used 2 different colors of the small rectangular pieces you can by for ~$0.25 for plain solid colors to ~$1.00 for the “fancy” embossed/glittery/etc. ones)

-something “coaster sized” to trace (keep in mind straight lines are easier to cut)

-chalk (we used sidewalk chalk)

-scissors

-needle & thread (Br choose to do 2 different contrasting colors.  Hey, it’s his present to Daddy…)

Tracing the coaster on to the flannel

I helped Br line our object up with the corner of the flannel (so he’d only have to cut 2 sides) and steadied it while he traced around it with the sidewalk chalk.  Br is old hat at this now, but make sure to explain to them to keep the chalk right against the object so they get a nice straight line, and check that it is showing up on the flannel, in case they need to trace over it again.

Have them cut along their chalk lines.


Cutting out the coaster
Cutting out the coaster- Voice of experience: if you don't want a "rounded" corner, it can be helpful to explain to them it is easier to get the nice square corner if they cut one side, then stop and cut the other side until they meet

Repeat with the second piece of flannel.  Match the 2 pieces together.  Let your child choose their thread (Br chose “aqua” thread for the first needles worth, and “black” for the second), and thread the needle.

Voice of Experience: I “double-threaded” it so the thread won’t pull out of the needle as they are sewing- pulled the thread through so it is doubled over (twice the length you want it, with the needle in the middle, and then the two ends tied in a single knot) and made it about a foot and a half long (long enough to give room for free sewing, but not unmanageable for short arms).  I did need to do multiple needles worth for Br to get the whole coaster “sewn”.

knot from thread hidden in middle

I started the needle in the coaster for him (put the knot on the inside),and then let Br take over.  The first time we did this activity was the first time Br had sewn, so here is a summary of the directions I gave him:

1)showed him the needle and explained the pointy end is what he will push though the cloth, but to watch out that he doesn’t poke himself with the pointy end

Br starting sewing
Br starting sewing

2)Once he has poked the needle partially through, grab the needle on the other side and pull it the rest of the way through

3) pull the thread tight, but not so tight the fabric gets wrinkly (showed what it looked like if the thread isn’t tight enough, as well as how to flatten it back out when it gets pulled too tight)

Br sewing
Br sewing- second needles worth, where Br decided he needed to switch to black thread

4)be careful to go back in with the next stitch from the same side you came out (this needed lots of reminding, with a few we didn’t catch early enough, which then goes back to making sure you don’t pull the thread so tight it gets wrinkly…)

I kept an eye out for when the thread was getting short, then offered to tie a knot and start a new thread for him.  He was pretty well done with the activity by the time we were almost done with the second needles worth (was starting to suggest “Mommy, you can finish it…”)  I tried to suggest he put some stitches in corners he hadn’t sewn yet as he was getting to the end.

Br showing his finished flannel coaster for Daddy

Happy Father’s Day!


You might want to read this too:

  • This post was singularly original...wander at will!

The importance of boogeying in the kitchen

I was speaking with one of the Early Childhood Education experts from First 5 of El Dorado County the other day (Kristen Torres, to be specific).  She was telling me she gets asked all the times by busy parents “what is the ONE thing I can do for my children that will make the most difference?”  Kristen’s response “Dance!”

While I am all for getting my “boogey” on, mostly in the kitchen these days, and grabbing whatever kid wanders by first to conscript in, I was a little surprised by her answer.  Kristen went onto explain that “rhythm” is important for a number of developmental steps (at this point I was concerned for my best friend’s son…hope he inherits his mommy’s rhythm!).

Language is rhythmic, walking & running is rhythmic.  By dancing with your children, you are helping to develop their rhythmic awareness in a fun & engaging way (all about play as learning!).  There often happen to be other side benefits: bonding (see my “conscription” above), aerobic exercise, “crossing the midline”- left/right & top/bottom (important for connecting brain hemispheres), vestibular system development (inner ear- important for balance & sensory integration) from our fancy spinning, and if you sing along loudly like me, vocabulary development.*

*on that note, be a little careful of your musical choices.  Like don’t accidentally download the ORIGINAL version of CeeLo’s “Forget You” like my husband did.  Don’t want to develop that kind of vocabulary….

So, grab that kid, crank those tunes (but try not to blow out their developing ear drums…), and get your dance on!  If your husband gives you funny looks when he comes in, pass him a kid and tell him it’s required curriculum: you’re making your kids smarter!  :)


You might want to read this too:

  • This post was singularly original...wander at will!