I just got a great new resource: Montessori At Home! by John Bowman. I’d contacted him to see about ordering both the CD & the updated hardcopy book, and he offered to send it to me for feedback & to review on the website. I’ve only read about a third of the book, and I already have post-its poking out all over it as I marked activities that I HAVE to try. Also an awesome breakdown of Montessori philosophy and the best practical points I have seen on how to set up the activities (PHENOMENAL explanation-with pictures even!!- of the types of activities that should be set up to progressively teach your child the correct hand position for writing).
Turns out there are some things I haven’t done ideally. For example, Mr. Bowman says it isn’t a good idea to set out materials until you have the activity completely set up. Makes sense. If I am trying to instill in my child respect for the materials and always making sure he takes care to put his stuff away properly, I should be modeling by respecting the materials enough not to put it out until it is ready for him to do his part. Oops… (Of course, as I write this, I still haven’t taken the half-completed items off the shelf yet. Note to self: do before bed!)
You: “Ummm… where’s the part about plumbing?’
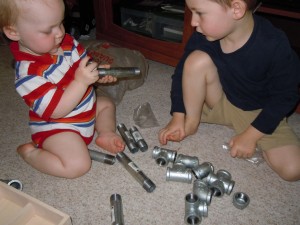
So, one of the activities suggested in Montessori At Home is pipe building. When I spotted that, I thought “OMG [I didn’t actually think the letters, but I am sometimes lazy in typing], Br is going to love this activity!!!!!!!” [I did think that many exclamation points] Br has loved all things tool related from near-infancy. I finally got him to sign “please” by having a tape measure on a shelf he couldn’t reach. And while this pipe building didn’t actually use tools, it uses things that are closely related to tools. (Br did REALLY want to use tools, and had to be reminded that his hands were his “tools” for this activity multiple times, and if he DID use a real pipe wrench, he wouldn’t be able to get it back apart when it was time to put the job away…)
We ran out as close to first thing this morning as I manage with two kids & no emergency, and got pipe parts at Home Depot. The book suggested 1″ pipe parts, but when I had Br try to fit them, they seemed heavy for Br to handle, so I ended up going with 3/4″ galvanized steel parts. The boxes were a bit of a mess (things weren’t matching up with their label), but a very helpful HD employee helped us to find the pieces.
Materials:
-mixture of 3/4″ ‘male’ & ‘female” galvanized pipe fittings. Specifically, we used: x2 3/4″ “Tees”, x2 3/4″ “90 degree elbows”, x2 3/4″ “45 degree elbows”, x1 3/4″ “sideout elbow”, x5 3/4″x4″ straight piece, x2 3/4″x5″ straight piece, x4 3/4″x6″ straight piece
-marble/rock/bead (smaller than 3/4″ diameter)
-substantial container with good handles for storing/carrying (still working on this part…) {They are heavy!- Bl dropped one on his toe. There was crying…}
Voice of experience: We did have one straight piece where the threads were messed up & it wouldn’t screw together. Luckily we caught it early, so Br didn’t get too frustrated. It would have been a good idea to just quickly try all the pieces at the store. I did rub the threads with soap to make it easier for them to screw together/apart. (Yes, you literally take a bar of soap and rub the threads across it, so little soap flakes are in there. It helps lubricate it. I don’t usually use bar soap, so all I cold find was a travel size rose-scented soap in our house…) For the detail oriented, you may note a “cross” (“4 hole” piece) in the picture. I will be taking it back. Made the pipes just run back in to each/not work well. And it was expensive (over $6!).

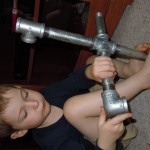
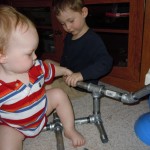
Br built his free form “pipe sculpture”, which took awhile. Especially with attaching things facing different directions, there were a few challenges with remembering which way to turn it to tighten, as well as the dilemma movements to tighten one piece might loosen another. Some great problem solving opportunities. There were some partial dis-assemblies in the process. Once he had it mostly together, I pointed out to him we wanted to cap all but 2 openings, 1 opening for stuff to go in & 1 for stuff to go out.


 Bl noticed that he could also make fun sounds/sound “travel” by yelling into one end of the pipe. That added a bonus element of fun…
Once the pipe was built, it was time to test it out. Mr. Bowman suggested a marble or actually running water through it. I opted for marble, but couldn’t locate one. I did find as options 1 wooden bead, 3 small white stones, and a small black glass florist thing. They used them all. This is where it got super cool. I’d realized we would be working on fine motor skills, left & right (“right-ey tight-ey, left-ey loose-ey”), & some spatial reasoning putting the pipes together. I hadn’t thought about the sensorial & science aspects. To get the pieces to move through the pipes, we discussed gravity & what part of the pipes to lift to make them roll where we wanted them too, & “hypothesized” where we thought they were. Sensorially, besides Bl yelling into the pipes, there was focusing on the sounds of the objects as they moved through the pipes & using that to try to pinpoint where they were, as well as the differences between the sounds the wood bead made versus the rocks & glass piece.
Awesome, awesome activity. Thank you Montessori At Home!

I love this activity
Yeah, they thought this was pretty cool too! If you ask nicely, your nephews might let you play with it next time you come visit. 🙂
Gwen – I am really happy your boys found this activity so cool! That is a wonderful description of you and your boys experiences with the material – so many practical suggestions on doing the activity. Outstanding! Maybe they could make a pipe and take it outside to run water through it sometime – that is very cool, too. Thanks so much for posting this.
I love that you described everything so thoroughly, Gwen – from your experiences buying materials at Home Depot to the extensions you tried! It was great to read what worked best for your sons. I love the Montessori at Home book, too, and it’s fun to read about your experiences using activities from the book! I featured one of your photos at http://livingmontessorinow.com/2011/09/19/montessori-monday-building-a-flashlight-and-pipe-building/.
Thanks, Deb! We are flattered to be featured in your blog! We’ve certainly enjoyed & appreciated the stuff we’ve seen there. It is a pleasure to be included in such wonderful company. 🙂
HANGING OUT to try this…..
enjoyed this post & found you through the montessori at home ebook, which i am totally enjoying! i am headed to home depot today to shop for some of the threaded fittings as my son is PLUMBER obsessed! on another note, i am trying to get started with montessori style homeschool with my 3 year old son & my 15 month old daughter. i am in need of suggestions for storing materials in a way that my daughter doesn’t get them all out all the time, yet my son has access to them without having to climb up high. how have you handeled this with your little one? thank you for your time. laura
I actually ended up taking the pluming job to my son’s preschool, and it has been a hit for many kids! I really recommend finding a couple small things (marbles, rocks, small piece of wood, etc.) to drop though it too. Great way to extend the lesson and explore some different things (sound, gravity, shorter routes).
For suggestions on storing things separately, other than the height thing you already mentioned, is possibly by “time”- some things we save to pull out during the little ones nap time. Another option may be to have a sort of “sacrificial job”- something that will keep the little one entertained for a while on their own if you want the older one to have some quiet separate work time.
Amusingly, as my boys have gotten a little bit older, the younger one is often more interested in doing the jobs anyways, and I’ve been surprised at what he has been able to do with jobs I thought were too “mature” for him!
Very useful information, teach through lively activities, learned a lot from this passage, adorable.
Thnak you for your nice comment! I actually just ran across some of the pipes, that had wandered into our little used side of the driveway, and was thinking I should put that job together again!